If you want to run separate stations (or zones) on different days, you would use 2 different programs. Hunter controllers have multiple programs (A, B, and C) and the ability for each program to have multiple start times. To set up each program, you would need START TIMES, RUNTIMES, and WATER DAYS for each of them.
Here is an example of a program for a 4 station controller:
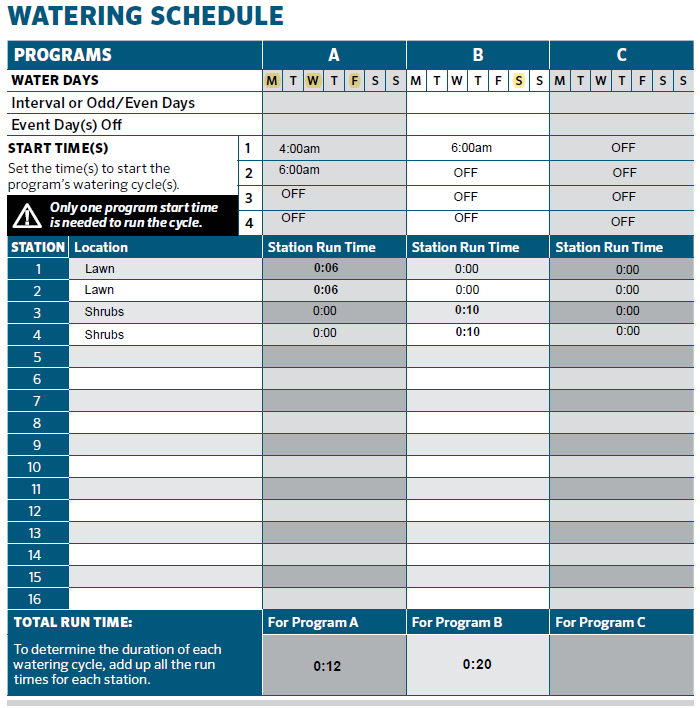
You have a 4 Station Pro-C controller. Your lawn stations are valves #1 and #2. Your shrubs stations are valves #3 and #4. You want the lawn stations to water Monday, Wednesday, and Friday at 4:00 am and again at 6:00 am for 6 minutes per station. Finally, you want the shrub stations to water on Saturdays at 6:00 am for 10 minutes per station.
Here is what each program would look like on the door card:

To set the programs shown in the example above:
- Turn the dial to the START TIMES position. Look for the capital “A” near the start time number. If the display shows another letter, press the “PRG” button until the “A” appears on the display. Press the RIGHT ARROW button until the display shows “1-A”. Press the “+” button to set the start time to 4:00am. Press the RIGHT ARROW to advance to start time 2. Press the “+” button to set start time 2 to 6:00 am. Make sure start times 3 and 4 in Program A are set to “OFF”. The OFF position is between 11:45 pm and 12:00 am.
- Turn the dial to RUN TIMES. Press the “+” or “-“ button to change station 1 to 6-minute run time (0:06). Press the RIGHT ARROW button to station 2 and set for a 6-minute run time (0:06). Make sure stations 3 and 4 are set for zero run time (0:00).
- Turn the dial to the WATER DAYS position. The symbol above “MO” should be flashing. (If you see the “MO” flashing, press the right arrow 9 times until you see the symbol above “MO” flashing) Press the “+” to set Monday as a water day. Press the “-“ button when the symbol is flashing above TU, TU will show as a no-water day (drop with a circle). Press the “+” to set Wednesday as a water day, press the “-“ button to set Thursday as a no-water day, press the “+” to set Friday as a water day, press the “-“ button to set Saturday as a no-water day, press the “-“ button to set Sunday as a no-water day. The symbol will go back to flash above Monday. Program A is now set.
- Turn the dial to the START TIMES position. Press the “PRG” button. Look for the lower case “b” near the start time number. Press the RIGHT ARROW button until the display shows “1-b”. Press the “+” button to select the program start time (set start time 1 to 6:00 am). Press the RIGHT ARROW to advance to start time 2. Make sure Start Times 2, 3, and 4 in Program B are set to “OFF”. The OFF position is between 11:45 pm and 12:00 am.
- Turn the dial to RUN TIMES. Make sure stations 1 and 2 in Program B are set for zero run time (0:00). Press the RIGHT ARROW button to station 3. Press the “+” or “-“ button to set station 3 to 10-minute run time (0:10). Press the RIGHT ARROW button to advance to station 4 and set to the 10-minute run time (0:10).
- Turn the dial to the WATER DAYS position. The symbol above “MO” should be flashing. (If you see the “MO” flashing, press the right arrow 9 times until you see the symbol above “MO” flashing) Press the “-“ button when the symbol is flashing above MO, TU, WE, TH, FR. Press the “+” to set Saturday as a water day, press the “-“ button to set Sunday as a no-water day, The symbol will go back to flash above Monday. Program B is now set. Set All Start Times in Program C to “OFF”. The OFF position is between 11:45 pm and 12:00 am.
Ainda precisa de ajuda? Conte conosco.
Conte-nos que tipo de ajuda você precisa para encontrarmos a melhor solução para você.

