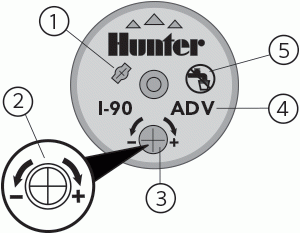
- Lift up socket
- Arc adjustment direction
- Arc adjustment socket
- Specific model
- Non-potable water
Adjustable heads are preset to approximately 180°. The I-90 can be adjusted from 40-360 degrees. Sprinklers may be adjusted with water on or off. It is recommended that initial adjustment be made before installation.
Note: It is not necessary to disassemble the sprinkler to make adjustments.
- Rotate the nozzle turret clockwise to the right stop. This is the fixed side of the arc. The nozzle turret must be held in this position for arc adjustments. The right stop does not change

To Increase Arc
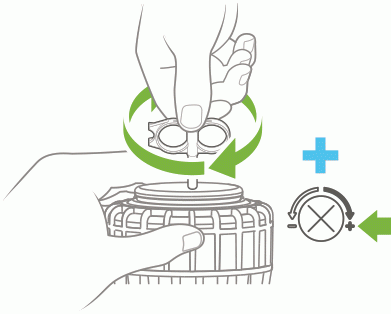
- Insert the plastic key end of the Hunter wrench into the adjustment socket.
- While holding the nozzle turret at the right stop, turn the wrench clockwise. Each full 360º turn of the wrench increases the arc 45º.
- Adjust to any arc between 40º and 360º. The wrench will stop turning, or there will be a ratcheting noise, when the maximum arc of 360º (full circle) has been reached.

To Decrease Arc:
- Insert the key end of the Hunter wrench into the adjustment socket.
- While holding the nozzle turret at the right stop, turn the wrench counterclockwise. Each full 360º turn of the wrench will decrease the arc 45º.
- Adjust to any arc between 40º and 360º. The wrench will stop turning, or there will be a ratcheting noise, when the minimum arc of 40º has been reached.
If the right side of the arc is not properly aligned, the results may be a wet walkway or a dry turf area. The right side can easily be realigned. One way to realign the right stop is to unscrew the body cap counterclockwise and remove the internal assembly from the body. Once removed, rotate the nozzle turret to the right stop, insert the internal assembly back into the body with the nozzle aligned to the right side of the area you want irrigated. At this point you realigned the right arc stop, and you can adjust the left arc to an appropriate setting.
If you have excessively wet or dry areas, you can change the nozzle in the sprinkler to increase or decrease the precipitation rate. For dry areas, install a larger nozzle. For wet areas, install a smaller nozzle.
Note: Refer to the Nozzle/Stator Chart below for nozzle and stator settings.
| Nozzle/Stator Chart | |
| Nozzle Number | Stator Position |
| 33 | 33 |
| 38 | 38 |
| 43 | 43 |
| 48 | 48 |
| 53 | 53 |
| 63 | 63 |
Still need help? We're here.
Tell us what you need support with and we'll find the best solution for you.


