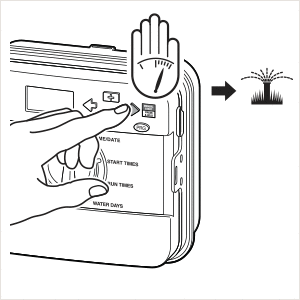
You can manually test proper operation of the rain sensor by using the One Touch Manual Start. During the Manual All stations cycle, press the test button on the “Clik-type” sensor (eg. Mini-Clik®) to interrupt watering.
Note: The rain sensor will only interrupt watering in Manual All Stations and automatic programming. Manual single station will override the sensor circuit.


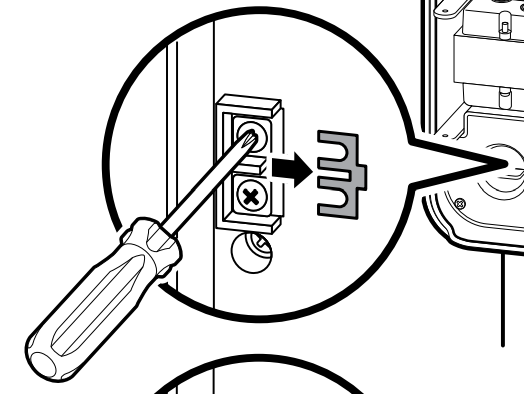
- Make sure the terminal jumper has been removed. Most irrigation controllers use a sensor circuit that provides terminals where the sensor wires will connect. If the controller uses a normally closed sensor circuit (most common) the terminals will be connected by a jumper clip or wire. This terminal jumper will need to be removed for the rain sensor to operate correctly.
- Some controllers come with a Rain Sensor Bypass switch. Make sure the switch is in the “Active” or “On” position.
- The Mini-Clik sensor can be adjusted to activate at different amounts of rainfall. Check the sensor to see if it is set for the appropriate rainfall amount.
- Make sure the sensor is located in an area where it is unobstructed from the rain. Overhangs, trees or anything else that may prevent rain from reaching the sensor should be avoided.
- Wiring shorts on the sensor circuit will not allow the controller to recognize an open circuit when the sensor activates. For example, if the sensor wire were stapled to the siding of the house, a staple could cut into the wire insulation and create a short across the two conductors.
- The Wireless Rain-Clik sensor relies on a radio signal from the sensor to reach a receiver at the controller. If the radio signal is obstructed, the controller may not respond to the active sensor. Make sure the sensor and receiver are installed in such a way that communication is allowed. Obstructed signals or interference problems may be resolved by moving the sensor or receiver to another location where communication is possible.
- The Wireless Rain-Clik uses an address code to prevent cross-talk with other sensors or radio devices. A sensor and receiver set for different addresses will not communicate. For more information on setting the address, please click here.
- Test the status of the battery. With the sensor dry, press the quick response spindle on the sensor. Within a few seconds, the LED light on the bottom of the sensor will briefly flash. Release the spindle and the LED light will flash again. If the LED flashes, the battery in the transmitter is good. If the LED light on the sensor does not flash red, the sensor will need to be replaced. Learn More
NOTE: Sensor Status LED is red after power outage:
When the power is restored to the receiver the “SENSOR STATUS” LED will always appear red. The transmitter will automatically synchronize with the receiver (this may take from 1 minute to 1 hour). If you want an immediate synchronization, press and hold down the “Test” button for 5 seconds, then release the “Test” button. The “Sensor Status” LED will turn to green.
Still need help? We're here.
Tell us what you need support with and we'll find the best solution for you.

