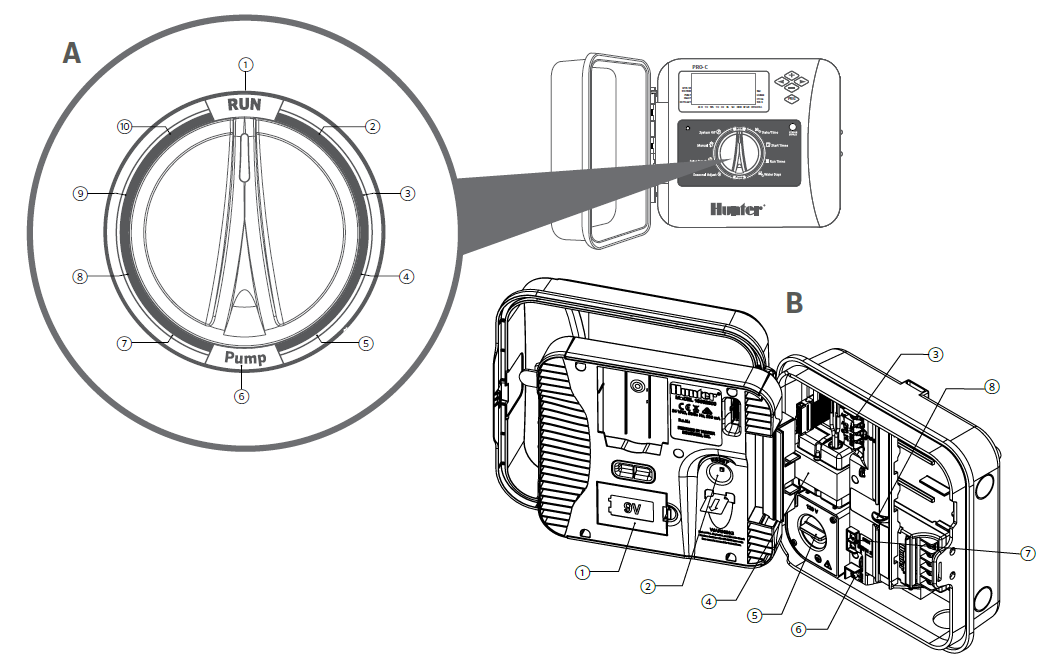
| A | Control Dial | B | Wiring Compartment | ||
|---|---|---|---|---|---|
| 1 | Run | Normal dial position for automatic operation |
1 | 9 V Battery | An alkaline battery (not included) allows programming of the controller facepack without AC power |
| 2 | Set Date/Time | Set the current date and time | 2 | Reset Button | Resets the controller, keeping all programmed data intact |
| 3 | Set Progam Start Times | Set 1 - 4 start times in each program | 3 | SmartPort® Input Terminals |
Used to connect a SmartPort Wiring Harness, which enables Hunter remote controls |
| 4 | Set Station Run Times | Set run time for each station | 4 |
Transformer |
Internal 24 VAC transformer, prewired with power cord and plug |
| 5 | Set Days to Water | Select individual days to water, odd, even or interval watering schedule |
5 | Junction Box | Wiring compartment that provides an area for connecting primary AC power to the controller |
| 6 | Set P/MV Operation | Enable or disable the Pump or Master Valve for each station |
6 | Common Terminal | Used for field Common connections to solenoid valves; also used to complete sensor circuit wiring |
| 7 | Seasonal Adjustment | Apply global adjustments to station run times based on seasonality (5% to 300%) |
7 | Sensor Inputs (x2) | Used to connect Hunter Solar Sync and Clik Sensors |
| 8 | Solar Sync Sensor | Allows user to program settings when using Solar Sync ET Sensor |
8 | Power Slide | Slide power lock On and Off when inserting and removing PCM output modules |
| 9 | Manual Single Station | Activates one-time watering of a single station |
|||
Still need help? We're here.
Tell us what you need support with and we'll find the best solution for you.

